第 1 节 / 共 7 节
深度学习简介
Day01 笔记:深度学习简介
Day 01 - 深度学习简介
学习目标
-
理解深度学习的基本概念
-
了解深度学习的常用模型
-
了解深度学习的预备数学知识
-
掌握安装pytorch的方法
-
理解张量的概念
-
掌握张量的基本创建方式
-
掌握创建线性和随机张量
-
掌握创建全 0/1 张量
-
掌握张量元素的类型转换
-
掌握张量 和 numpy 之间的相互转换
学习目标
- 理解深度学习的基本概念
- 深度学习(Deep Learning)是机器学习的分支,是一种以人工神经网络为架构,对数据进行特征学习的算法。
- 深度学习中的“深度”是指在网络中使用多层。
- 了解深度学习的常用模型
- 全连接神经网络(DNN / MLP): 适用于结构化数据(如表格数据)、简单分类与回归任务,比如商品销量预测、房价预测等。
- 卷积神经网络(CNN): 适用于处理图像与视觉任务,比如图像分类、目标检测、图像分割、人脸识别等。
- 循环神经网络(RNN): 适用于顺序数据相关的任务,比如自然语言处理(NLP)、语音识别、时间序列预测。
- Transformer: 当前主流模型,覆盖文本与图像等多领域,比如机器翻译、文本生成、对话系统、多模态任务。
- Diffusion(扩散模型): 当前图像/视频生成的主导架构(如 Stable Diffusion、Sora)。
-
了解深度学习的预备数学知识
- 线性代数
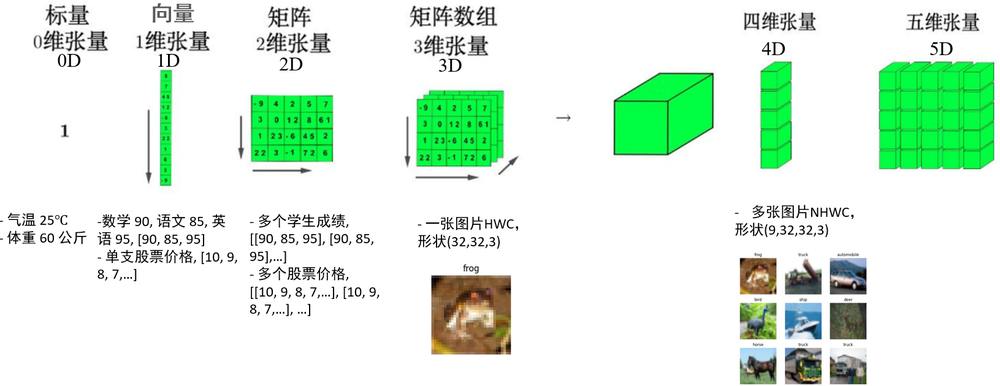
- 标量只有一个数值,称作0维/0D张量
- 向量为标量组成的列表,称作一维张量/1D张量
- 矩阵为多个向量组成的二维数组,称作二维张量/2D张量
- \(L_2\)范数是向量元素平方和的平方根:
- 导数和微分
- 导数是一个比值极限,可以将导数\(f'(x)\)解释为\(f(x)\)相对于\(x\)的 瞬时 变化率
- 线性代数
-
掌握安装pytorch的方法
- 安装miniconda/anaconda
- 创建虚拟环境dl_project
- 安装pytorch
- 验证pytorch安装
- 理解张量的概念
- 张量(Tensor)是深度学习中的数据容器,张量可以描述任意数量轴的n维数组,n≥0
- 掌握张量的基本创建方式
- torch.tensor 根据指定数据创建张量
- torch.Tensor 根据形状创建张量, 其也可用来创建指定数据的张量
- torch.IntTensor、torch.FloatTensor、torch.DoubleTensor 创建指定类型的张量
- 掌握创建线性和随机张量
- torch.arange() 创建一个线性张量,一维张量
- torch.linspace() 创建一个等差数列,一维张量
- torch.rand() 创建一个随机数,形状任意
- torch.randn() 创建一个随机数, 形状任意
- torch.randint() 创建一个随机数, 形状任意
- 掌握创建全 0/1 张量
- torch.ones 和 torch.ones_like 创建全1张量
- torch.zeros 和 torch.zeros_like 创建全0张量
- torch.full 和 torch.full_like 创建全为指定值张量
- 掌握张量元素的类型转换
- data.type(torch支持的数据类型)
- data.to(torch支持的数据类型)
- data.half/double/float/short/int/long()
- 掌握张量 和 numpy 之间的相互转换
- 张量 转 numpy数组对象:张量对象.numpy()
- numpy数组对象 转 张量:torch.tensor(numpy数组对象)
- 标量张量 转 python数值:张量对象.item()
# 导包
import torch
import torch.nn as nn
import torch.optim as optim
import numpy as np
import matplotlib.pyplot as plt
# 设置中文字体
plt.rcParams['font.sans-serif'] = ['SimHei']  # 微软雅黑
plt.rcParams['axes.unicode_minus'] = False            # 解决负号显示问题
# 设置设备
device = torch.device("cuda" if torch.cuda.is_available() else "cpu")
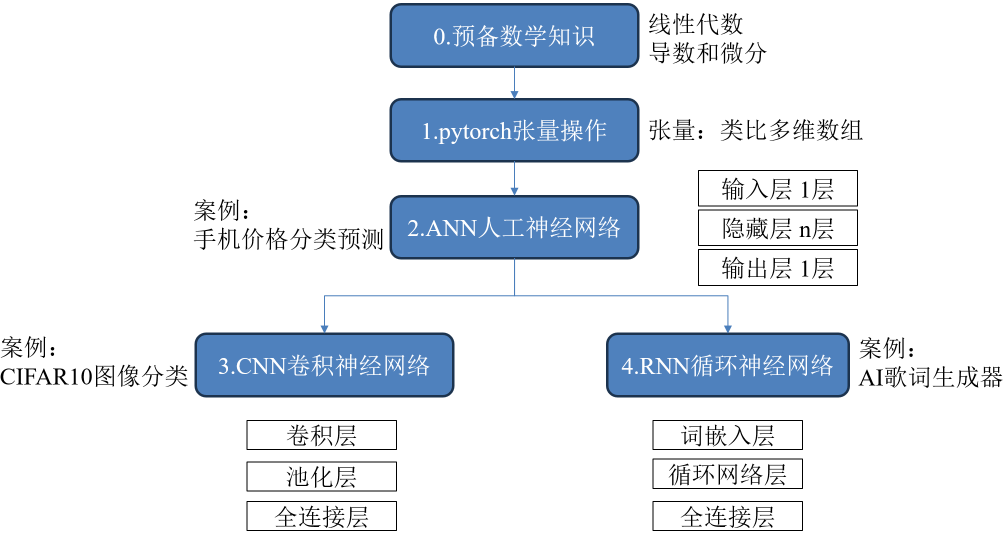
课程大纲
-
- 预备数学知识
-
- pytorch张量操作
-
- ANN人工神经网络 Artifical neural network
-
- CNN卷积神经网络 Convolutional neural network
-
- RNN循环神经网络 Recurrent neural network
1.什么是深度学习[知道]
深度学习(Deep Learning)是机器学习的分支,是一种以人工神经网络为架构,对数据进行特征学习的算法。深度学习中的形容词“深度”是指在网络中使用多层。
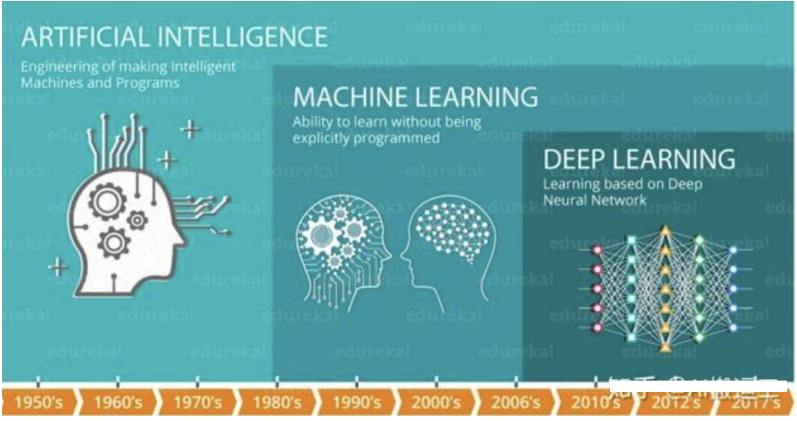
深度学习核心思想是==通过模仿人脑的神经网络来处理和分析复杂的数据,从大量数据中自动提取复杂特征==,擅长处理高维数据,如图像、语音和文本。
2.深度学习特点[知道]
-
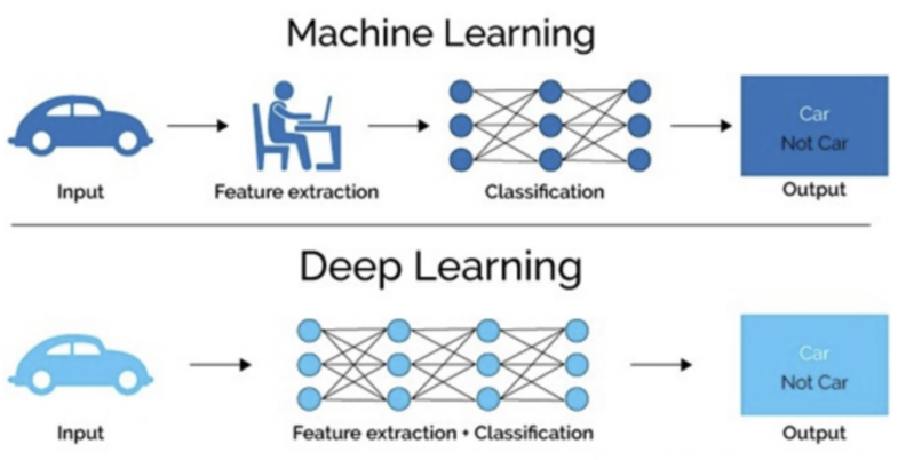
多层非线性变换:神经网络模型由多个层次组成,每一层都应用非线性激活函数对输入数据进行变换。较低的层级通常捕捉到简单的特征(如边缘、颜色等),而更高的层级则可以识别更复杂的模式(如物体或面部识别)。
-
自动特征提取:与传统机器学习算法不同,深度学习能够从原始数据中自动提取特征,不需要人工特征工程。
-
大数据和计算能力:神经网络模型通常需要大量的标注数据和强大的计算资源(如GPU)来进行训练。大数据和高性能计算使得深度学习在图像识别、自然语言处理等领域取得了显著突破。
-
可解释性差:神经网络模型内部的运作机制相对不透明,被称为“黑箱”,难以解释模型的决策逻辑或过程。
3.常见的深度学习模型[了解]
- 全连接神经网络(DNN / MLP)
- 输入输出均为定长向量,多用于结构化数据的分类与回归。
-
在图像/文本任务中已很少单独使用,多作为基础组件。
-
卷积神经网络(CNN)
- 利用卷积核提取局部特征,是图像分类、检测、分割的经典主力。
-
工程部署中仍是最常用、最高效的视觉模型体系。
-
循环神经网络(RNN)
- 处理序列数据(时间序列、NLP),LSTM/GRU 能建模长依赖。
-
在大多数任务中已被 Transformer 取代。
-
Diffusion Models(扩散模型)
- 当前图像/视频生成的主导架构(如 Stable Diffusion、Sora)。
-
生成质量、稳定性和自由度全面优于 GAN。
-
Transformer(当今最主流架构)
- 通过自注意力捕获全局关系,是 NLP 的事实标准。
-
在视觉领域衍生出 ViT、Swin Transformer,并成为 LLM / VLM 的核心架构。
-
图神经网络(GNN)
- 处理图结构数据,如分子结构、社交网络、知识图谱。
-
典型模型:GCN、GAT、GraphSAGE,在药物发现与推荐系统中应用广泛。
-
深度强化学习(DRL)
- 将神经网络与强化学习结合,用于序列决策与控制。
- 典型方法:DQN、PPO;应用于 AlphaGo、机器人、自主驾驶等。
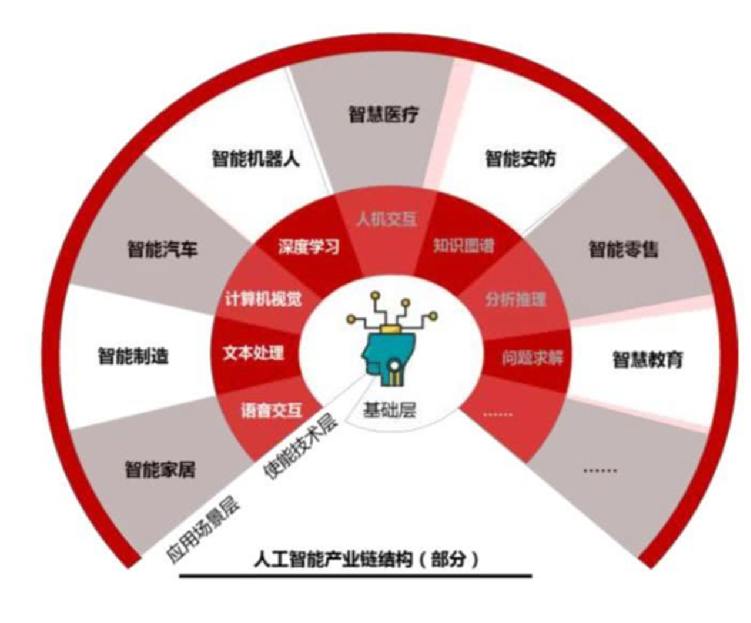
4.深度学习应用场景[了解]
-
==计算机视觉(Computer Vision)==
-
图像分类:将图像分为不同的类别。常用于人脸识别、物体检测等。
- 自动标注社交媒体照片、医疗影像中的病变检测。
- 目标检测(Object Detection):在图像或视频中定位并分类多个对象。
- 自动驾驶中的行人检测、监控视频中的入侵检测。
-
面部识别:通过分析面部特征进行身份验证或分类。
- 手机解锁、安防监控系统。
-
图像生成:基于输入生成新的图像,如风格转换、图像超分辨率等。
- 艺术风格迁移、老旧照片修复。
-
==自然语言处理(Natural Language Processing, NLP)==
-
机器翻译:使用深度学习模型将一种语言的文本自动翻译成另一种语言。
- Google翻译、实时语音翻译。
-
情感分析:分析文本中的情感倾向,如正面、负面或中性。
- 社交媒体监控、产品评论分析。
-
文本生成:生成符合语法和语义的自然语言文本。
- 自动写作助手、新闻生成。
-
语音识别:将语音转化为文字。
- 智能助手(如Siri、Alexa)、自动字幕生成。
-
聊天机器人(Chatbot):通过深度学习理解用户输入并生成合理的回应。
- 客服机器人、虚拟助手(如GPT类模型)。
-
==推荐系统(Recommendation Systems)==
-
电影、音乐推荐:根据用户历史的评分和行为,推荐相关的电影、音乐或电视剧。
- Netflix、Spotify的个性化推荐。
- 电商推荐:根据用户的购买历史和浏览习惯推荐商品。
- 亚马逊、淘宝的商品推荐系统。
- 社交媒体推荐:分析用户的社交行为,推荐相关内容或朋友。
- Facebook、Instagram的内容推荐。
...
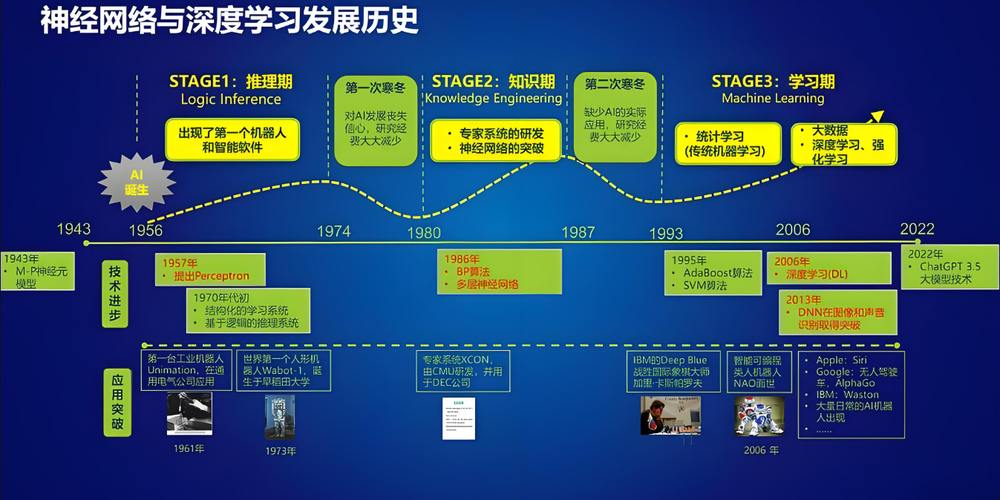
5.深度学习发展史[了解]
-
早期探索
-
20世纪40年代:沃尔特·皮茨(Walter Pitts)和沃伦·麦卡洛克(Warren McCulloch)等开始模仿生物神经系统来构建计算模型,如McCulloch-Pitts神经元
- 1958年:弗兰克·罗森布拉特(Frank Rosenblatt)提出感知器概念,能够进行简单的二分类任务
- 1960年代末:出现了多层感知器(MLP),但当时由于计算能力和数据量的限制,这些模型的应用受到很大限制
- 图灵测试:如果一台机器能够与人类展开对话(透过电传设备)而不被辨别出其机器身份,那么称这台机器具有智慧
-
挑战与瓶颈
-
1986年:反向传播算法(Backpropagation)的提出标志着神经网络研究的一个重要突破。杰弗里·辛顿(Geoffrey Hinton)和大卫·鲁梅尔哈特(David Rumelhart)等人提出了反向传播算法,使得多层神经网络(即深层网络)能够通过梯度下降优化参数,解决复杂的非线性问题。
- 虽然神经网络方法在一些领域表现不错,但由于计算资源的限制以及对复杂数据(如图像和语音)的处理能力较弱,深度学习未能广泛应用。此时,支持向量机(SVM)、决策树等传统机器学习方法成为主流。
-
复兴与突破
-
2006年:杰弗里·辛顿和其团队提出了深度信念网络(DBN),标志着深度学习的复兴。他们引入了无监督预训练的技术,使得深层网络能够有效训练。这为深度学习的发展奠定了基础。
- 2012年:深度学习的一个重要突破是AlexNet的出现。亚历克斯·克里泽夫斯基(Alex Krizhevsky)在ImageNet图像分类竞赛中使用了一个深度卷积神经网络,显著提升了图像分类的精度,比传统方法提高了20%以上。AlexNet的成功标志着深度学习在计算机视觉领域的成功应用。
- 2014年:生成对抗网络(GANs)由伊恩·古德费洛(Ian Goodfellow)等人提出,开启了生成模型的新时代,能够生成非常逼真的图像、音频和视频。
- 2015年:ResNet(残差网络)由何凯明(Kaiming He)等提出,解决了深度网络中的梯度消失和梯度爆炸问题,允许训练极深的网络(如50层、152层),极大推动了深度学习在图像识别任务中的应用。
- 爆发期
- **2016年:**Google AlphaGo 战胜李世石(人工智能第三次浪潮),AlphaGo 展现了深度强化学习(Deep Reinforcement Learning)在解决复杂问题上的巨大潜力,将其推向了公众视野。
- **2017年:**自然语言处理NLP的Transformer框架出现,奠定了后续预训练语言模型(如 BERT 和 GPT)的基础。
- **2018年:**BERT和GPT的出现,基于Transformer架构的预训练语言模型的代表。
- **2022年:**ChatGPT的出现,进入到大模型AIGC发展的阶段,开启了 AI 与人交互的新模式,使人们可以更容易地使用 AI 并从中受益。
6.扩展-预备的数学知识-理解
线性代数
- 标量
标量只有一个数值,称作零维张量/0D张量
下面的代码将实例化两个标量,并执行一些熟悉的算术运算,即加法、乘法、除法和指数。
import torch

x = torch.tensor(3.0)
y = torch.tensor(2.0)

x + y, x-y, x * y, x / y, x**y
(tensor(5.), tensor(1.), tensor(6.), tensor(1.5000), tensor(9.))
- 向量
向量可以被视为标量值组成的列表,称作一维张量/1D张量
通过一维张量表示向量。
x = torch.arange(5)
x
tensor([0, 1, 2, 3, 4])
在数学中,向量\(\mathbf{x}\)可以写为:
其中\(x_1,\ldots,x_n\)是向量的元素。在代码中,通过张量的索引来访问任一元素。
x[3]
tensor(3)
- 矩阵
多个向量组成的二维数组,称作二维张量/2D张量
通常用粗体、大写字母来表示
(例如,\(\mathbf{X}\)、\(\mathbf{Y}\)和\(\mathbf{Z}\)),
表示具有两个轴的张量。
数学上,使用\(\mathbf{A} \in \mathbb{R}^{m \times n}\)
来表示矩阵\(\mathbf{A}\),其由\(m\)行和\(n\)列的实值标量组成。
可以将任意矩阵\(\mathbf{A} \in \mathbb{R}^{m \times n}\)视为一个表格,
其中每个元素\(a_{ij}\)属于第\(i\)行第\(j\)列:
对于任意\(\mathbf{A} \in \mathbb{R}^{m \times n}\),
\(\mathbf{A}\)的形状是(\(m\),\(n\))或\(m \times n\)。
通过指定形状\(m \times n\)来创建矩阵
A = torch.arange(20).reshape(5, 4)
A
tensor([[ 0,  1,  2,  3],
        [ 4,  5,  6,  7],
        [ 8,  9, 10, 11],
        [12, 13, 14, 15],
        [16, 17, 18, 19]])
可以通过行索引(\(i\))和列索引(\(j\))来访问矩阵中的标量元素\(a_{ij}\),
例如\([\mathbf{A}]_{ij}\)。
A[1,2]
tensor(6)
矩阵的转置(transpose) : 交换矩阵的行和列。
通常用\(\mathbf{a}^\top\)来表示矩阵的转置。
A.T
tensor([[ 0,  4,  8, 12, 16],
        [ 1,  5,  9, 13, 17],
        [ 2,  6, 10, 14, 18],
        [ 3,  7, 11, 15, 19]])
- 张量
深度学习中的数据容器,可以描述任意数量轴的n维数组, n≥0
张量是描述具有任意数量轴的\(n\)维数组的通用方法。
例如,向量是一维张量,矩阵是二维张量。
张量用特殊字体的大写字母表示(例如,\(\mathsf{X}\)、\(\mathsf{Y}\)和\(\mathsf{Z}\)),
它们的索引机制(例如\(x_{ijk}\)和\([\mathsf{X}]_{1,2i-1,3}\))与矩阵类似。
比如图像数据,通常为3维张量,HWC格式的3个轴对应于高度height、宽度width,以及一个通道channel轴,用于表示颜色通道(红色、绿色和蓝色)。
32323
X = torch.arange(24).reshape(2, 3, 4)
X
tensor([[[ 0,  1,  2,  3],
         [ 4,  5,  6,  7],
         [ 8,  9, 10, 11]],

        [[12, 13, 14, 15],
         [16, 17, 18, 19],
         [20, 21, 22, 23]]])
- 张量的维度和形状
张量的维度用来表示张量具有的轴的数量。张量的某个轴的维数就是这个轴/维的长度。
| 概念 | 0D: 体重60 | 1D: 股价[10, 9, 8, 7, 6] | 2D: 多个股价[[10, 9, 8, 7, 6], [10, 9, 8, 7, 6]] | 3D: 单个图片HWC, 形状(32, 32, 3) | |
|---|---|---|---|---|---|
| 形状 Shape | 张量在每个轴的长度,描述了张量的结构。 | () |
(5) |
(2, 5) |
(32, 32, 3) |
| 每个维度的长度 Length | 张量在某一维度的长度,表示该维度/轴的元素数。 | None | 5 |
2, 5 |
32, 32, 3 |
| 维度/轴数 Dimension/Axes | 张量的维度数,即张量形状的长度,表示数据有几个轴。 | 0 | 1 | 2 | 3 |
# 0D 张量(0轴)
tensor_0d = torch.tensor(3)
print("0D 张量:")
print(tensor_0d)
print(f"维度/轴数: {tensor_0d.ndimension()}")  # 输出: 0 (0 个轴)
print(f"形状: {tensor_0d.shape}")  # 输出: torch.Size([])
print()
0D 张量:
tensor(3)
维度/轴数: 0
形状: torch.Size([])
# 1D 张量(一轴)
tensor_1d = torch.tensor([1, 2, 3, 4])
print("1D 张量:")
print(tensor_1d)
print(f"维度/轴数: {tensor_1d.ndimension()}")  # 输出: 1 (1 个轴)
print(f"形状: {tensor_1d.shape}")  # 输出: torch.Size([4])
print(f"第一轴的长度: {tensor_1d.size(0)}")  # 输出: 4 (第一轴的长度)
print()
1D 张量:
tensor([1, 2, 3, 4])
维度/轴数: 1
形状: torch.Size([4])
第一轴的长度: 4
# 2D 张量(两轴)
tensor_2d = torch.tensor([[1, 2, 3], [4, 5, 6]])
print("2D 张量:")
print(tensor_2d)
print(f"维度/轴数: {tensor_2d.ndimension()}")  # 输出: 2 (2 个轴)
print(f"形状: {tensor_2d.shape}")  # 输出: torch.Size([2, 3])
print(f"第一轴的长度: {tensor_2d.size(0)}")  # 输出: 2 (第一轴的长度)
print(f"第二轴的长度: {tensor_2d.size(1)}")  # 输出: 3 (第二轴的长度)
print()
2D 张量:
tensor([[1, 2, 3],
        [4, 5, 6]])
维度/轴数: 2
形状: torch.Size([2, 3])
第一轴的长度: 2
第二轴的长度: 3
# 3D 张量(三轴)
tensor_3d = torch.randn(2, 3, 4)  # 随机生成一个形状为 (2, 3, 4) 的张量
print("3D 张量:")
print(tensor_3d)
print(f"维度/轴数: {tensor_3d.ndimension()}")  # 输出: 3 (3 个轴)
print(f"形状: {tensor_3d.shape}")  # 输出: torch.Size([2, 3, 4])
print(f"第一轴的长度: {tensor_3d.size(0)}")  # 输出: 2 (第一轴的长度)
print(f"第二轴的长度: {tensor_3d.size(1)}")  # 输出: 3 (第二轴的长度)
print(f"第三轴的长度: {tensor_3d.size(2)}")  # 输出: 4 (第三轴的长度)
3D 张量:
tensor([[[-0.6098, -1.5741, -0.1081, -1.1542],
         [ 0.8110, -1.1747, -0.0876, -0.7189],
         [ 0.4491, -0.4631, -0.6066, -0.2520]],

        [[-1.0018,  0.8333,  1.6792,  1.0797],
         [-1.0365,  0.1009,  0.3324, -0.0785],
         [ 0.8173, -1.6884, -0.3801,  0.4057]]])
维度/轴数: 3
形状: torch.Size([2, 3, 4])
第一轴的长度: 2
第二轴的长度: 3
第三轴的长度: 4
- 范数
向量的范数是表示一个向量有多大。
\(L_2\)范数是向量元素平方和的平方根:
($\(\|\mathbf{x}\|_2 = \sqrt{\sum_{i=1}^n x_i^2},\)$)
其中,在\(L_2\)范数中常常省略下标\(2\),也就是说\(\|\mathbf{x}\|\)等同于\(\|\mathbf{x}\|_2\)。
在代码中,我们可以按如下方式计算向量的\(L_2\)范数。
注意:深度学习中的L2范数,是指平方项的和,没有开根号。
u = torch.tensor([3, 4.])
torch.norm(u)
tensor(5.)
\(L_1\)范数,它表示为向量元素的绝对值之和:
($\(\|\mathbf{x}\|_1 = \sum_{i=1}^n \left|x_i \right|.\)$)
与\(L_2\)范数相比,\(L_1\)范数受异常值的影响较小。
torch.abs(u).sum()
tensor(7.)
\(L_p\)范数:
[矩阵]\(\mathbf{X} \in \mathbb{R}^{m \times n}\) 的Frobenius范数(Frobenius norm)是矩阵元素平方和的平方根:
$\(\|\mathbf{X}\|_F = \sqrt{\sum_{i=1}^m \sum_{j=1}^n x_{ij}^2}\)$
torch.norm(torch.ones((9, 9)))
tensor(9.)
导数和微分
假设有一个函数\(f: \mathbb{R} \rightarrow \mathbb{R}\),其输入和输出都是标量。
\(f\)的导数被定义为:
$\(f'(x) = \lim_{h \rightarrow 0} \frac{f(x+h) - f(x)}{h}\)$
如果\(f'(a)\)存在,则称\(f\)在\(a\)处是可微(differentiable)的。
如果\(f\)在一个区间内的每个数上都是可微的,则此函数在此区间中是可微的。
我们可以将导数\(f'(x)\)解释为\(f(x)\)相对于\(x\)的瞬时(instantaneous)变化率。
注意:
- 导函数\(f'(x)\)表示函数\(f(x)\)在一个区间的导数。
- 导数\(f'(a)\)表示导函数\(f'(x)\)在\(a\)处的数值。
- 深度学习中,导数也称作梯度, 导数可能是 导函数 或 导数,根据语义区分。
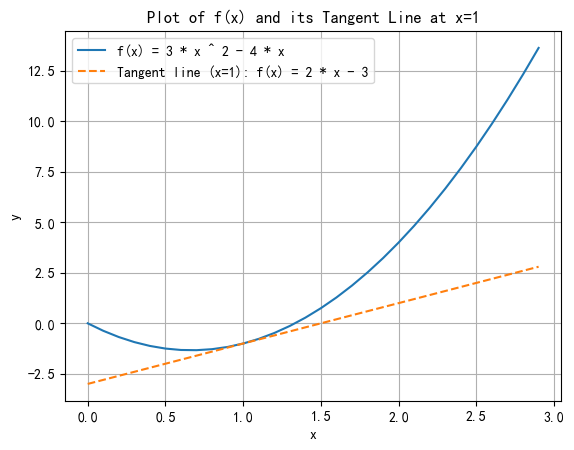
为了更好地解释导数,让我们做一个实验。
(定义\(u=f(x)=3x^2-4x\))如下:
%matplotlib inline
import matplotlib.pyplot as plt
import numpy as np
from matplotlib_inline import backend_inline

def f(x):
    return 3 * x ** 2 - 4 * x   # 6x - 4
通过令\(x=1\)并让\(h\)接近\(0\),(\(\frac{f(x+h)-f(x)}{h}\)的数值结果接近\(2\))
def numerical_lim(f, x, h):
    return (f(x + h) - f(x)) / h

h = 0.1
for i in range(6):
    print(f'h={h:.6f}, numerical limit={numerical_lim(f, 1, h):.6f}')
    h *= 0.1
h=0.100000, numerical limit=2.300000
h=0.010000, numerical limit=2.030000
h=0.001000, numerical limit=2.003000
h=0.000100, numerical limit=2.000300
h=0.000010, numerical limit=2.000030
h=0.000001, numerical limit=2.000003
导数符号,
给定\(y=f(x)\),其中\(x\)和\(y\)分别是函数\(f\)的自变量和因变量。以下表达式是等价的:
其中符号\(\frac{d}{dx}\)和\(D\)是微分运算符,表示微分操作。
常见函数求微分:
- \(C' = 0\)(\(C\)是一个常数)
- \((x^n)' = nx^{n-1}\)(\(n\)是任意实数)
- \((e^x)' = e^x\)
- \((\ln(x))' = 1/x\)
# 创建 x 数据
x = np.arange(0, 3, 0.1)

# 绘制 f(x) 和切线
plt.plot(x, f(x), label="f(x) = 3 * x ^ 2 - 4 * x")  # 绘制函数 f(x)
plt.plot(x, 2 * x - 3, label='Tangent line (x=1): f(x) = 2 * x - 3', linestyle='--')  # 绘制切线

# 添加标签、标题和图例
plt.xlabel('x')
plt.ylabel('y')
plt.title('Plot of f(x) and its Tangent Line at x=1')
plt.legend()
plt.grid()
plt.show()
7. 安装PyTorch
- 安装miniconda
下载地址 https://www.anaconda.com/download/success
- 初始化conda
# conda init --all
- 创建虚拟环境dl_project
# conda create -n dl_project python=3.10
# conda activate dl_project
- 安装pytorch
选择CPU版本/GPU版本,
参考网址:https://pytorch.org/get-started/locally/
如果没有GPU,直接安装CPU版本的pytorch
# CPU
# pip3 install torch torchvision
如果有英伟达的GPU,首先检查支持的CUDA版本,然后安装对应CUDA版本的pytorch
- 建议:如果GPU显存 >= 4G,则安装GPU版本的pytorch,否则直接安装CPU版本的pytorch
# 首先查看本机支持的CUDA版本,向下兼容
nvidia-smi
# GPU, 比如CUDA12.6,要根据CUDA版本选择对应的安装命令,参考
# pip3 install torch torchvision --index-url https://download.pytorch.org/whl/cu126
- 验证pytorch安装
import torch

print("pytorch版本: ", torch.__version__)
print("能否使用GPU: ", torch.cuda.is_available())

if torch.cuda.is_available():
    print(f"GPU型号: {torch.cuda.get_device_name()}")  # 获取 GPU 名称
pytorch版本:  2.10.0.dev20251114+cu128
能否使用GPU:  True
GPU型号: NVIDIA GeForce RTX 5070 Laptop GPU
8. 什么是PyTorch?
PyTorch是Facebook开发的深度学习框架,具有以下特点:
- 类似于NumPy的张量计算
- PyTorch中的基本数据结构是张量(Tensor),它与NumPy中的数组类似,但PyTorch的张量具有GPU加速的能力(通过CUDA),这使得深度学习模型能够高效地在GPU上运行。
- 自动微分系统
- PyTorch提供了强大的自动微分功能(autograd模块),能够自动计算模型中每个参数的梯度。
- 自动微分使得梯度计算过程变得简洁和高效,并且支持复杂的模型和动态计算图。
- 深度学习库
- PyTorch提供了一个名为torch.nn的子模块,用于构建神经网络。它包括了大量的预构建的层(如全连接层、卷积层、循环神经网络层等),损失函数(如交叉熵、均方误差等),以及优化算法(如SGD、Adam等)。
- torch.nn.Module是PyTorch中构建神经网络的基础类,用户可以通过继承该类来定义自己的神经网络架构。
- 动态计算图
- PyTorch使用动态计算图机制,允许在运行时构建和修改模型结构,具有更高的灵活性,适合于研究人员进行实验和模型调试。
- GPU加速(CUDA支持)
- PyTorch提供对GPU的良好支持,能够在NVIDIA的CUDA设备上高效地进行计算。用户只需要将数据和模型转移到GPU上,PyTorch会自动优化计算过程。
- 通过简单的
tensor.to(device)方法,可以轻松地将模型和数据从CPU转移到GPU或从一个GPU转移到另一个GPU。 - 跨平台支持
- PyTorch支持在多种硬件平台(如CPU、GPU、TPU等)上运行,并且支持不同操作系统(如Linux、Windows、macOS)以及分布式计算环境(如多GPU、分布式训练)。
9. 什么是PyTorch张量?
张量是PyTorch中的核心数据抽象
-
PyTorch中的张量就是元素为同一种数据类型的多维数组,类似NumPy数组。
-
PyTorch中,张量以"类"的形式封装起来,对张量的一些运算、处理的方法(数值计算、矩阵操作、自动求导)被封装在类中。
day01_01_张量的基本创建方式
- torch.tensor()
- torch.Tensor()
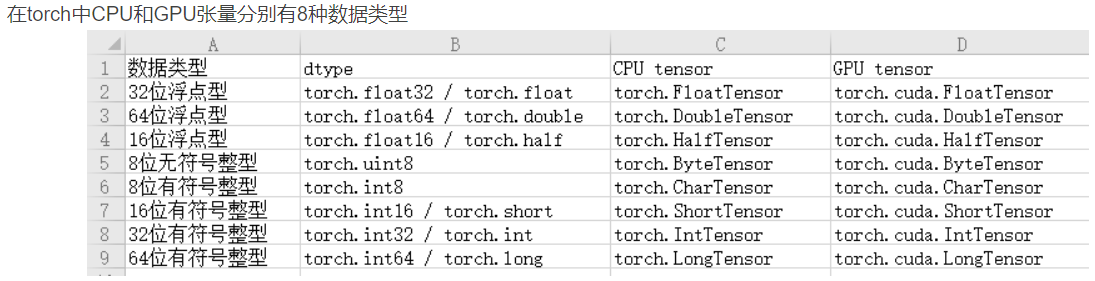
- 张量的数据类型有
- 张量中默认的数据类型是float32(torch.FloatTensor)
- torch.tensor 根据指定数据创建张量
"""
案例:
    演示 张量的基本创建方式
张量:
    pytorch框架 是 最常用的深度学习框架, 后续 ANN, CNN, RNN, 底层数据操作,都是使用 张量

    张量:存储 同一种数据类型的元素的容器,元素必须是数值
张量的基本创建方式:
    torch.tensor 根据指定数据创建张量
    torch.Tensor 根据形状创建张量, 其也可用来创建指定数据的张量
    torch.IntTensor、torch.FloatTensor、torch.DoubleTensor 创建指定类型的张量

tensor 与 Tensor的区别:
    Tensor 多了一个功能:可以指定形状

需要掌握:
    torch.tensor(数据,元素类型)
"""

# 导包
import torch

# 1.定义函数,演示 torch.tensor, 根据数据来创建张量
def demo01():
    # 场景1,创建0维 / 0D张量, 也就是标量
    t1 = torch.tensor(6)
    print("0维张量:")
    print(f"t1: {t1}, type: {type(t1)}, shape: {t1.shape}, dtype元素类型:{t1.dtype}")
    print('-'*60)
    # 场景2,创建1维张量,也就是向量
    t2 = torch.tensor([1,2,3,4,5], dtype=torch.float32)
    print("1维张量:")
    print(f"t2: {t2}, type: {type(t2)}, shape: {t2.shape}, dtype元素类型:{t2.dtype}")
    print('-'*60)
    # 场景3,创建2维张量,也就是矩阵
    t3 = torch.tensor([[1,2,3],[4,5,6]])
    print("2维张量:")
    print(f"t3: {t3}, type: {type(t3)}, shape: {t3.shape}, dtype元素类型:{t3.dtype}")
    print('-'*60)
    # 创建3维张量,也就是立方体
    t4 = torch.tensor([[[1,2,3],[4,5,6]],[[7,8,9],[10,11,12]]], device='cuda')
    print("3维张量:")
    print(f"t4: {t4}, type: {type(t4)}, shape: {t4.shape}, dtype元素类型:{t4.dtype}")
    # 打印张量的属性,type, shape, dtype, device
    print(f"t4: type: {t4.type()}, shape: {t4.shape}, dtype元素类型:{t4.dtype}, device: {t4.device}")
    # # 场景4,创建指定形状的张量,2*4
    # t5 = torch.tensor(2,4)
    # print(f"t5: {t5}, type: {type(t5)}, shape: {t5.shape}, dtype元素类型:{t5.dtype}")


# 测试
if __name__ == '__main__':
    demo01()
0维张量:
t1: 6, type: <class 'torch.Tensor'>, shape: torch.Size([]), dtype元素类型:torch.int64
------------------------------------------------------------
1维张量:
t2: tensor([1., 2., 3., 4., 5.]), type: <class 'torch.Tensor'>, shape: torch.Size([5]), dtype元素类型:torch.float32
------------------------------------------------------------
2维张量:
t3: tensor([[1, 2, 3],
        [4, 5, 6]]), type: <class 'torch.Tensor'>, shape: torch.Size([2, 3]), dtype元素类型:torch.int64
------------------------------------------------------------
3维张量:
t4: tensor([[[ 1,  2,  3],
         [ 4,  5,  6]],

        [[ 7,  8,  9],
         [10, 11, 12]]], device='cuda:0'), type: <class 'torch.Tensor'>, shape: torch.Size([2, 2, 3]), dtype元素类型:torch.int64
t4: type: torch.cuda.LongTensor, shape: torch.Size([2, 2, 3]), dtype元素类型:torch.int64, device: cuda:0
- torch.Tensor 根据形状创建张量, 其也可用来创建指定数据的张量
"""
案例:
    演示 张量的基本创建方式
张量:
    pytorch框架 是 最常用的深度学习框架, 后续 ANN, CNN, RNN, 底层数据操作,都是使用 张量

    张量:存储 同一种数据类型的元素的容器,元素必须是数值
张量的基本创建方式:
    torch.tensor 根据指定数据创建张量
    torch.Tensor 根据形状创建张量, 其也可用来创建指定数据的张量
    torch.IntTensor、torch.FloatTensor、torch.DoubleTensor 创建指定类型的张量

tensor 与 Tensor的区别:
    Tensor 多了一个功能:可以指定形状

需要掌握:
    torch.tensor(数据,元素类型)
"""

# 导包
import torch

# 2.定义函数,演示 torch.Tensor, 根据数据来创建张量
def demo02():
    # 场景1,创建0维 / 0D张量, 也就是标量
    t1 = torch.Tensor(6)
    print("0维张量:")
    print(f"t1: {t1}, type: {type(t1)}, shape: {t1.shape}, dtype元素类型:{t1.dtype}")
    print('-'*60)
    # 场景2,创建1维张量,也就是向量
    t2 = torch.Tensor([1,2,3,4,5])
    print("1维张量:")
    print(f"t2: {t2}, type: {type(t2)}, shape: {t2.shape}, dtype元素类型:{t2.dtype}")
    print('-'*60)
    # 场景3,创建2维张量,也就是矩阵
    t3 = torch.Tensor([[1,2,3],[4,5,6]])
    print("2维张量:")
    print(f"t3: {t3}, type: {type(t3)}, shape: {t3.shape}, dtype元素类型:{t3.dtype}")
    print('-'*60)
    # 创建3维张量,也就是立方体
    t4 = torch.Tensor([[[1,2,3],[4,5,6]],[[7,8,9],[10,11,12]]])
    print("3维张量:")
    print(f"t4: {t4}, type: {type(t4)}, shape: {t4.shape}, dtype元素类型:{t4.dtype}")
    # 打印张量的属性,type, shape, dtype, device
    print(f"t4: type: {t4.type()}, shape: {t4.shape}, dtype元素类型:{t4.dtype}, device: {t4.device}")
    # 场景4,创建指定形状的张量,2*4
    t5 = torch.Tensor(2, 4)
    print(f"t5: {t5}, type: {type(t5)}, shape: {t5.shape}, dtype元素类型:{t5.dtype}")


# 测试
if __name__ == '__main__':
    demo02()
0维张量:
t1: tensor([0., 0., 0., 0., 0., 0.]), type: <class 'torch.Tensor'>, shape: torch.Size([6]), dtype元素类型:torch.float32
------------------------------------------------------------
1维张量:
t2: tensor([1., 2., 3., 4., 5.]), type: <class 'torch.Tensor'>, shape: torch.Size([5]), dtype元素类型:torch.float32
------------------------------------------------------------
2维张量:
t3: tensor([[1., 2., 3.],
        [4., 5., 6.]]), type: <class 'torch.Tensor'>, shape: torch.Size([2, 3]), dtype元素类型:torch.float32
------------------------------------------------------------
3维张量:
t4: tensor([[[ 1.,  2.,  3.],
         [ 4.,  5.,  6.]],

        [[ 7.,  8.,  9.],
         [10., 11., 12.]]]), type: <class 'torch.Tensor'>, shape: torch.Size([2, 2, 3]), dtype元素类型:torch.float32
t4: type: torch.FloatTensor, shape: torch.Size([2, 2, 3]), dtype元素类型:torch.float32, device: cpu
t5: tensor([[0., 0., 0., 0.],
        [0., 0., 0., 0.]]), type: <class 'torch.Tensor'>, shape: torch.Size([2, 4]), dtype元素类型:torch.float32
- torch.IntTensor、torch.FloatTensor、torch.DoubleTensor 创建指定类型的张量
"""
案例:
    演示 张量的基本创建方式
张量:
    pytorch框架 是 最常用的深度学习框架, 后续 ANN, CNN, RNN, 底层数据操作,都是使用 张量

    张量:存储 同一种数据类型的元素的容器,元素必须是数值
张量的基本创建方式:
    torch.tensor 根据指定数据创建张量
    torch.Tensor 根据形状创建张量, 其也可用来创建指定数据的张量
    torch.IntTensor、torch.FloatTensor、torch.DoubleTensor 创建指定类型的张量

tensor 与 Tensor的区别:
    Tensor 多了一个功能:可以指定形状

需要掌握:
    torch.tensor(数据,元素类型)
"""

# 导包
import torch

# 3.定义函数,演示 torch.IntTensor, FloatTensor, DoubleTensor, 根据数据来创建张量
def demo03():
    # 场景1,创建一个2*3的张量,使用torch.FloatTensor
    t1 = torch.FloatTensor([[1,2,3],[4,5,6]])
    print("2维张量:")
    print(f"t1: {t1}, type: {type(t1)}, shape: {t1.shape}, dtype元素类型:{t1.dtype}")

# 测试
if __name__ == '__main__':
    demo03()
2维张量:
t1: tensor([[1., 2., 3.],
        [4., 5., 6.]]), type: <class 'torch.Tensor'>, shape: torch.Size([2, 3]), dtype元素类型:torch.float32
张量的属性
- type: 对象的类型
- shape: 张量的形状
- dtype: 数据类型
- device: 存储位置(CPU/GPU)
- requires_grad: 是否需要梯度
# 张量属性
t = torch.tensor(
    [[1, 2, 3], [4, 5, 6], [7, 10, 9]],
    dtype=torch.float32,      # 使用浮点数(可参与梯度计算)
    requires_grad=True        # 开启梯度计算
    )
print("对象类型:", type(t))
print("形状:", t.shape)
print("元素类型:", t.dtype)
print("设备:", t.device)
print("开启梯度计算/自动微分:", t.requires_grad)
对象类型: <class 'torch.Tensor'>
形状: torch.Size([3, 3])
元素类型: torch.float32
设备: cpu
开启梯度计算/自动微分: True
day01_02_创建线性和随机张量
- torch.arange()
- torch.linspace()
- torch.rand()
- torch.randn()
- torch.randint()
"""
案例:
    演示 pytorch中 如何创建 线性 和 随机张量
涉及到的API:
    torch.arange() 和 torch.linspace() 创建线性张量
    torch.manual_seed() 随机种子设置
    torch.rand/randn() 创建随机浮点类型张量
    torch.randint(low, high, size=()) 创建随机整数类型张量

要掌握的:
    torch.arange()
    torch.linspace()
    torch.manual_seed()
    torch.randint(low, high, size=())

"""

# 导包
import torch

# 1.定义函数,演示 创建线性张量
def demo01():
    # 1.使用 torch.arange() 创建 线性张量
    # 参数1:起始值(包含);参数2:结束值(不包含);参数3:步长
    t1 = torch.arange(0,10,2) # [0,2,4,...,8]
    print(f"t1: {t1}, shape: {t1.shape}, dtype元素类型:{t1.dtype}")
    print('-'*60)
    # 2.使用 torch.linspace() 创建 线性张量
    # 参数1:起始值(包含);参数2:结束值(包含);参数3:元素个数
    t1 = torch.linspace(0, 9, 10)  # [0,2,4,...,8]
    print(f"t1: {t1}, shape: {t1.shape}, dtype元素类型:{t1.dtype}")


# 2.定义函数,演示 创建随机张量
def demo02():
    # 0.设置随机种子
    torch.manual_seed(6)
    # 1.使用torch.rand来创建一个随机张量,形状3*4,从U[0,1]随机采样
    t1 = torch.rand(3,4)
    print(f"t1: {t1}, shape: {t1.shape}, dtype元素类型:{t1.dtype}")
    print('-' * 60)
    # 2.使用torch.randn来创建一个随机张量,形状3*4,从标准正态分布N(0,1)随机采样
    t1 = torch.randn(3, 4)
    print(f"t1: {t1}, shape: {t1.shape}, dtype元素类型:{t1.dtype}")
    print('-' * 60)
    # 3.使用torch.randint来创建一个随机张量,形状3*4*5, 从[0,10]随机采样
    t1 = torch.randint(0, 10, (3, 4, 5))
    print(f"t1: {t1}, shape: {t1.shape}, dtype元素类型:{t1.dtype}")


# 测试
if __name__ == '__main__':
    demo01()
    demo02()
t1: tensor([0, 2, 4, 6, 8]), shape: torch.Size([5]), dtype元素类型:torch.int64
------------------------------------------------------------
t1: tensor([0., 1., 2., 3., 4., 5., 6., 7., 8., 9.]), shape: torch.Size([10]), dtype元素类型:torch.float32
t1: tensor([[0.5722, 0.5539, 0.9868, 0.6080],
        [0.2347, 0.4492, 0.6743, 0.7480],
        [0.5601, 0.1674, 0.3333, 0.4648]]), shape: torch.Size([3, 4]), dtype元素类型:torch.float32
------------------------------------------------------------
t1: tensor([[ 1.4557,  0.6403,  1.9355, -1.1402],
        [-0.1656,  0.3920,  1.0946, -0.4448],
        [-1.0702, -2.5711,  0.6639,  0.3103]]), shape: torch.Size([3, 4]), dtype元素类型:torch.float32
------------------------------------------------------------
t1: tensor([[[7, 1, 3, 3, 2],
         [3, 4, 2, 2, 1],
         [4, 9, 3, 9, 8],
         [0, 5, 7, 3, 2]],

        [[4, 4, 5, 0, 3],
         [4, 6, 6, 5, 4],
         [5, 5, 5, 1, 8],
         [1, 0, 7, 1, 9]],

        [[8, 4, 0, 9, 1],
         [4, 3, 4, 1, 6],
         [8, 6, 9, 9, 1],
         [3, 7, 1, 5, 6]]]), shape: torch.Size([3, 4, 5]), dtype元素类型:torch.int64
day01_03_创建全0_1_指定值张量
- torch.ones()
- torch.ones_like()
- torch.zeros()
- torch.zeros_like()
- torch.full()
- torch.full_like()
"""
案例:
    演示 创建 全0,全1,指定值的张量
涉及到的API:
    torch.ones 和 torch.ones_like 创建全1张量
    torch.zeros 和 torch.zeros_like 创建全0张量
    torch.full 和 torch.full_like 创建全为指定值张量

需要掌握:
    torch.zeros, 用于初始化模型的偏置参数
"""

# 导包
import torch

# 1.场景1: 演示 torch.ones 和 torch.ones_like 创建全1张量
t1 = torch.ones(2,3, dtype=torch.int64)
print(f"t1: {t1}, shape: {t1.shape}, dtype: {t1.dtype}")
print('-'*60)
# 演示 ones_like
t2 = torch.ones_like(t1)
print(f"t2: {t2}, shape: {t2.shape}, dtype: {t2.dtype}")
t1: tensor([[1, 1, 1],
        [1, 1, 1]]), shape: torch.Size([2, 3]), dtype: torch.int64
------------------------------------------------------------
t2: tensor([[1, 1, 1],
        [1, 1, 1]]), shape: torch.Size([2, 3]), dtype: torch.int64
# 2.场景1: 演示 torch.zeros 和 torch.zeros_like 创建全1张量
t1 = torch.zeros(2,3, dtype=torch.int64)
print(f"t1: {t1}, shape: {t1.shape}, dtype: {t1.dtype}")
print('-'*60)
# 演示 zeros_like
t2 = torch.zeros_like(t1)
print(f"t2: {t2}, shape: {t2.shape}, dtype: {t2.dtype}")
t1: tensor([[0, 0, 0],
        [0, 0, 0]]), shape: torch.Size([2, 3]), dtype: torch.int64
------------------------------------------------------------
t2: tensor([[0, 0, 0],
        [0, 0, 0]]), shape: torch.Size([2, 3]), dtype: torch.int64
# 3.场景1: 演示 torch.full 和 torch.full_like 创建固定值张量
t1 = torch.full((2,3),0)
print(f"t1: {t1}, shape: {t1.shape}, dtype: {t1.dtype}")
print('-'*60)
# 演示 full_like
t2 = torch.full_like(t1,fill_value=6)
print(f"t2: {t2}, shape: {t2.shape}, dtype: {t2.dtype}")
t1: tensor([[0, 0, 0],
        [0, 0, 0]]), shape: torch.Size([2, 3]), dtype: torch.int64
------------------------------------------------------------
t2: tensor([[6, 6, 6],
        [6, 6, 6]]), shape: torch.Size([2, 3]), dtype: torch.int64
day01_04_张量元素的类型转换
- .to()
- .type()
- .half/double/float/short/int/long()
"""
案例:
    演示 张量元素的类型转换

涉及到的API:
    data.to(torch.float32)
    data.type(torch.DoubleTensor)
    data.half/double/float/short/int/long()
需要掌握的:
    data.to(torch.float32)
    data.type(torch.DoubleTensor)
"""

# 导包
import torch

# 1.场景1:创建指定元素类型的张量
# 参数1:数据;参数2:元素类型dtype
t1 = torch.tensor([[1,2,3],[4,5,6]], dtype=torch.float32)
print(f"t1: {t1}, shape: {t1.shape}, dtype元素类型: {t1.dtype}")
print('-'*60)
# 2.场景2:先创建张量,再转换它的元素类型
# 参数1:数据
t2 = torch.tensor([[1,2,3],[4,5,6]])
print(f"t2: {t2}, shape: {t2.shape}, dtype元素类型: {t2.dtype}")
print('-'*60)
# 2.1 演示 .to 转换元素类型
t3 = t2.to(torch.float32)
print(f"t3: {t3}, shape: {t3.shape}, dtype元素类型: {t3.dtype}, device: {t3.device}")
t3 = t2.to(device="cuda")
print(f"t3: {t3}, shape: {t3.shape}, dtype元素类型: {t3.dtype}, device: {t3.device}")
print('-'*60)
# 2.2 演示 .type 转换元素类型
t3 = t2.type(torch.float32)
print(f"t3: {t3}, shape: {t3.shape}, dtype元素类型: {t3.dtype}")
# 2.3 演示data.half/double/float/short/int/long()
t3 = t2.double()
print(f"t3: {t3}, shape: {t3.shape}, dtype元素类型: {t3.dtype}")
t1: tensor([[1., 2., 3.],
        [4., 5., 6.]]), shape: torch.Size([2, 3]), dtype元素类型: torch.float32
------------------------------------------------------------
t2: tensor([[1, 2, 3],
        [4, 5, 6]]), shape: torch.Size([2, 3]), dtype元素类型: torch.int64
------------------------------------------------------------
t3: tensor([[1., 2., 3.],
        [4., 5., 6.]]), shape: torch.Size([2, 3]), dtype元素类型: torch.float32, device: cpu
t3: tensor([[1, 2, 3],
        [4, 5, 6]], device='cuda:0'), shape: torch.Size([2, 3]), dtype元素类型: torch.int64, device: cuda:0
------------------------------------------------------------
t3: tensor([[1., 2., 3.],
        [4., 5., 6.]]), shape: torch.Size([2, 3]), dtype元素类型: torch.float32
t3: tensor([[1., 2., 3.],
        [4., 5., 6.]], dtype=torch.float64), shape: torch.Size([2, 3]), dtype元素类型: torch.float64
- .to()
# 同时指定device和dtype
t1_gpu = t1.to(device=device, dtype=torch.float32)
print(t1_gpu)
tensor([[1., 2., 3.],
        [4., 5., 6.]], device='cuda:0')
day01_05_张量和numpy之间相互转换
- 张量 转 numpy数组对象:张量对象.numpy()
- numpy数组对象 转 张量:torch.tensor(numpy数组对象)
- 标量张量 转 python数值:张量对象.item()
"""
案例:
    演示 张量 和 numpy 之间的相互转换,以及 标量张量 转换为 python数值

涉及到的API:
    张量 转 numpy数组对象:
        张量对象.numpy()      共享内存,浅拷贝
        张量对象.numpy().copy() 不共享内存,深拷贝
    numpy数组对象 转 张量:
        torch.from_numpy(numpy数组对象)  共享内存,浅拷贝
        torch.tensor(numpy数组对象)       不共享内存,深拷贝
    标量张量 转 python数值:
        张量对象.item()

需要掌握:
    张量 转 numpy数组对象:张量对象.numpy() 共享内存,浅拷贝
    numpy数组对象 转 张量:torch.tensor(numpy数组对象) 不共享内存,深拷贝
    标量张量 转 python数值:张量对象.item()

"""

# 导包
import torch

# 1.定义函数,演示 张量 转 numpy数组对象
def demo01():
    # 0.设置随机种子
    torch.manual_seed(6)
    # 1.创建一个张量,3*6
    t1 = torch.randint(0,10,(3,6))
    print(f"t1: {t1}, shape: {t1.shape}, dtype元素类型:{t1.dtype}")
    print('-'*60)
    # 2.张量 -> numpy数组对象
    t2 = t1.numpy() # 共享内存,浅拷贝
    print(f"t2: {t2}, shape: {t2.shape}, dtype元素类型:{t2.dtype}")
    print('-'*60)
    # 演示 共享内存
    t2[0,0] = 100
    print(f"t1: {t1}, shape: {t1.shape}, dtype元素类型:{t1.dtype}")
    print(f"t2: {t2}, shape: {t2.shape}, dtype元素类型:{t2.dtype}")
    print('-' * 60)
    # 演示 不共享内存
    t3 = t2.copy() # 不共享内存,深拷贝
    print(f"t3: {t3}, shape: {t3.shape}, dtype元素类型:{t3.dtype}")
    print('-' * 60)
    t3[0,0] = 200
    print(f"t1: {t1}, shape: {t1.shape}, dtype元素类型:{t1.dtype}")
    print(f"t3: {t3}, shape: {t3.shape}, dtype元素类型:{t3.dtype}")


# 测试
if __name__ == '__main__':
    demo01()
t1: tensor([[0, 1, 3, 2, 4, 7],
        [7, 6, 4, 8, 7, 9],
        [5, 5, 7, 2, 3, 9]]), shape: torch.Size([3, 6]), dtype元素类型:torch.int64
------------------------------------------------------------
t2: [[0 1 3 2 4 7]
 [7 6 4 8 7 9]
 [5 5 7 2 3 9]], shape: (3, 6), dtype元素类型:int64
------------------------------------------------------------
t1: tensor([[100,   1,   3,   2,   4,   7],
        [  7,   6,   4,   8,   7,   9],
        [  5,   5,   7,   2,   3,   9]]), shape: torch.Size([3, 6]), dtype元素类型:torch.int64
t2: [[100   1   3   2   4   7]
 [  7   6   4   8   7   9]
 [  5   5   7   2   3   9]], shape: (3, 6), dtype元素类型:int64
------------------------------------------------------------
t3: [[100   1   3   2   4   7]
 [  7   6   4   8   7   9]
 [  5   5   7   2   3   9]], shape: (3, 6), dtype元素类型:int64
------------------------------------------------------------
t1: tensor([[100,   1,   3,   2,   4,   7],
        [  7,   6,   4,   8,   7,   9],
        [  5,   5,   7,   2,   3,   9]]), shape: torch.Size([3, 6]), dtype元素类型:torch.int64
t3: [[200   1   3   2   4   7]
 [  7   6   4   8   7   9]
 [  5   5   7   2   3   9]], shape: (3, 6), dtype元素类型:int64
"""
案例:
    演示 张量 和 numpy 之间的相互转换,以及 标量张量 转换为 python数值

涉及到的API:
    张量 转 numpy数组对象:
        张量对象.numpy()      共享内存,浅拷贝
        张量对象.numpy().copy() 不共享内存,深拷贝
    numpy数组对象 转 张量:
        torch.from_numpy(numpy数组对象)  共享内存,浅拷贝
        torch.tensor(numpy数组对象)       不共享内存,深拷贝
    标量张量 转 python数值:
        张量对象.item()

需要掌握:
    张量 转 numpy数组对象:张量对象.numpy() 共享内存,浅拷贝
    numpy数组对象 转 张量:torch.tensor(numpy数组对象) 不共享内存,深拷贝
    标量张量 转 python数值:张量对象.item()

"""

# 导包
import torch

# 2.定义函数,演示 numpy数组对象 转 张量
def demo02():
    # 0.设置随机种子
    torch.manual_seed(6)
    # 1.创建一个张量,3*6
    t1 = torch.randint(0,10,(3,6))
    print(f"t1: {t1}, shape: {t1.shape}, dtype元素类型:{t1.dtype}")
    print('-'*60)
    # 2.张量 -> numpy数组对象
    t2 = t1.numpy() # 共享内存,浅拷贝
    print(f"t2: {t2}, shape: {t2.shape}, dtype元素类型:{t2.dtype}")
    print('-'*60)
    # 3.numpy数值对象 -> 张量
    # t3 = torch.from_numpy(t2)   # 共享内存,浅拷贝
    t3 = torch.tensor(t2)   # 不共享内存,深拷贝
    print(f"t3: {t3}, shape: {t3.shape}, dtype元素类型:{t3.dtype}")
    print('-' * 60)
    # 演示 共享内存,浅拷贝
    t3[0,0] = 100
    print(f"t2: {t2}, shape: {t2.shape}, dtype元素类型:{t2.dtype}")
    print(f"t3: {t3}, shape: {t3.shape}, dtype元素类型:{t3.dtype}")

    # 演示 .item(), 转换标量张量 为 python数值
    a = torch.tensor([6])
    print(f"a: {a}, type: {type(a)}")
    b = a.item()
    print(f"b: {b}, type: {type(b)}")

# 测试
if __name__ == '__main__':
    demo02()
t1: tensor([[0, 1, 3, 2, 4, 7],
        [7, 6, 4, 8, 7, 9],
        [5, 5, 7, 2, 3, 9]]), shape: torch.Size([3, 6]), dtype元素类型:torch.int64
------------------------------------------------------------
t2: [[0 1 3 2 4 7]
 [7 6 4 8 7 9]
 [5 5 7 2 3 9]], shape: (3, 6), dtype元素类型:int64
------------------------------------------------------------
t3: tensor([[0, 1, 3, 2, 4, 7],
        [7, 6, 4, 8, 7, 9],
        [5, 5, 7, 2, 3, 9]]), shape: torch.Size([3, 6]), dtype元素类型:torch.int64
------------------------------------------------------------
t2: [[0 1 3 2 4 7]
 [7 6 4 8 7 9]
 [5 5 7 2 3 9]], shape: (3, 6), dtype元素类型:int64
t3: tensor([[100,   1,   3,   2,   4,   7],
        [  7,   6,   4,   8,   7,   9],
        [  5,   5,   7,   2,   3,   9]]), shape: torch.Size([3, 6]), dtype元素类型:torch.int64
a: tensor([6]), type: <class 'torch.Tensor'>
b: 6, type: <class 'int'>
day01_06.张量的基本运算
"""
案例:
    演示 张量的基本运算,也就是 + - * /
涉及到的API:
    add(), sub(), mul(), div(), neg()   # 加减乘除,取负
    add_(), sub_(), mul_(), div_(), neg_()  # 功能同上,但会修改原有数据, 功能类似pandas中的inplace=True

需要掌握:
    1.+, -, *, /, -  # 加减乘除,取负
    2.张量 和 标量 的运算: 就是 张量中的每个元素 和 这个标量 进行运算
"""

# 导包
import torch

# 1.创建一个张量,2*3
t1 = torch.tensor([[1,2,3],[4,5,6]])
print(f"t1: {t1}, shape: {t1.shape}, dtype元素类型: {t1.dtype}")

# 2.演示 加法,add()
t2 = t1.add(2)
t1.add_(2)
t1=t1.add(2)
print(f"t1: {t1}, shape: {t1.shape}, dtype元素类型: {t1.dtype}")
# 需要掌握 +
t2 = t1 + 2
print(f"t1 + 2: {t2}, shape: {t2.shape}, dtype元素类型: {t2.dtype}")

# 3.演示 减法,sub()
t2 = t1.sub(2)
print(f"t1 - 2: {t2}, shape: {t2.shape}, dtype元素类型: {t2.dtype}")
t1.sub_(2)
print(f"t1: {t1}, shape: {t1.shape}, dtype元素类型: {t1.dtype}")
t2 = t1 + (- 2)
print(f"t2: {t2}, shape: {t2.shape}, dtype元素类型: {t2.dtype}")

# 4.演示 取负
t2 = -t1
print(f"t2: {t2}, shape: {t2.shape}, dtype元素类型: {t2.dtype}")
t1: tensor([[1, 2, 3],
        [4, 5, 6]]), shape: torch.Size([2, 3]), dtype元素类型: torch.int64
t1: tensor([[ 5,  6,  7],
        [ 8,  9, 10]]), shape: torch.Size([2, 3]), dtype元素类型: torch.int64
t1 + 2: tensor([[ 7,  8,  9],
        [10, 11, 12]]), shape: torch.Size([2, 3]), dtype元素类型: torch.int64
t1 - 2: tensor([[3, 4, 5],
        [6, 7, 8]]), shape: torch.Size([2, 3]), dtype元素类型: torch.int64
t1: tensor([[3, 4, 5],
        [6, 7, 8]]), shape: torch.Size([2, 3]), dtype元素类型: torch.int64
t2: tensor([[1, 2, 3],
        [4, 5, 6]]), shape: torch.Size([2, 3]), dtype元素类型: torch.int64
t2: tensor([[-3, -4, -5],
        [-6, -7, -8]]), shape: torch.Size([2, 3]), dtype元素类型: torch.int64
常见面试题
1. 深度学习与传统机器学习的主要区别
- 特征工程:
- 传统机器学习依赖人来做特征工程(feature engineering),需要特定的领域知识。
- 深度学习可以自动从原始数据中提取特征,无需人参与。
- 多层非线性网络:
- 传统机器学习模型相对简单,如线性回归、SVM等。
- 深度学习模型通常由多层非线性神经网络组成,参数量大,表达能力更强。
- 数据需求:
- 传统机器学习在小数据集上也能表现较好。
- 深度学习通常需要大量数据才能发挥优势。
- 计算资源:
- 深度学习需要更多计算资源(GPU/TPU)。
- 传统机器学习对硬件要求较低,通常CPU就可以。
- 可解释性差:
- 深度学习模型类似“黑箱”,难以解释模型内部的具体决策过程。这对某些应用场景来说是一个挑战。
- 传统机器学习:模型结构更简单,可解释性更强。
2. 常见的深度学习模型及应用场景
- 全连接神经网络(DNN / MLP)
- 应用:适用于结构化数据(如表格数据)、简单分类与回归任务,比如商品销量预测、房价预测等。
- 卷积神经网络(CNN)
- 应用:处理图像与视觉任务,比如图像分类、目标检测、图像分割、人脸识别等。
- 循环神经网络(RNN)
- 应用:顺序数据相关的任务,比如自然语言处理(NLP)、语音识别、时间序列预测。
- Transformer
- 应用:当前主流模型,覆盖文本与图像等多领域,比如机器翻译、文本生成、对话系统、多模态任务。
- Diffusion(扩散模型)
- 应用:当前图像/视频生成的主导架构(如 Stable Diffusion、Sora)。
3. 数学中的矩阵是深度学习中的几维张量?
- 数学中的矩阵对应深度学习中的 2维张量。
4. 数组 [3, 4] 的 L2 范数
- L2 范数(欧几里得范数)计算公式为平方和再开根号:
$
|[3,4]|_2 = \sqrt{3^2 + 4^2} = \sqrt{9 + 16} = \sqrt{25} = 5
$
代码作业
- 1.使用torch.tensor()、torch.arange()和torch.randn()分别创建一个形状为(3, 4)的张量,并打印。
- 2.创建一个形状为(5,10)的全0张量 和 全1张量,并打印。
- 3.使用torch.randint()创建一个形状为(3, 4)的随机整数张量,并将元素类型转换为torch.float32,并打印。
- 4.使用torch.rand()创建一个形状为(3, 4)的张量,然后转换为numpy数组,然后更改其中的一个元素为42,然后再转换为张量,并打印。
- 5.创建一个标量张量,并转换为 python数值,并打印。
扩展-常用国内 PyPI 镜像
- 阿里云 https://mirrors.aliyun.com/pypi/simple/
- 腾讯云 https://mirrors.cloud.tencent.com/pypi/simple/
- 网易云 https://mirrors.163.com/pypi/simple/
- 清华大学 https://pypi.tuna.tsinghua.edu.cn/simple/
- 中国科技大学 https://pypi.mirrors.ustc.edu.cn/simple/
- 豆瓣 https://pypi.doubanio.com/simple/
使用方法:
- pip install 包名 -i 镜像地址
比如:pip install numpy -i https://mirrors.aliyun.com/pypi/simple/
Day01 代码:张量创建与类型转换
4 个文件- 📄 01_张量的基本创建方式.py 3.6KB 下载
- 📄 02_创建线性和随机张量.py 1.6KB 下载
- 📄 03_创建全0_1_指定值张量.py 1.9KB 下载
- 📄 04_张量元素的类型转换.py 1.3KB 下载
每日一图
- 🖼️ day01.png 87.4KB